If you sell your painting to an out-of-state buyer, chances are you’ll need to send the artwork by courier. Of course, this raises practical concerns. What is the best way to package an oil painting? Oil paintings are more susceptible to damage, especially if there are thick areas of the canvas covered with multiple layers of paint.
For this reason, we do not recommend rolling up your oil painting to send in a tube. This is OK for a poster or photographic print but taking an oil painting off its stretcher and rolling it increases the risk of damage. Oil paintings take a long time to dry and are more susceptible to damage from light, heat, humidity, dust and dirt. It’s just not worth risking damage to shave shipping costs, it’s a false economy. If you are on a budget it is best to send the item Economy or use a competitively priced courier service. Choose a professional courier, checking feedback scores and customer reviews as well as prices.
Points to Consider
Will you be sending a framed or unframed canvas? Finding the right balance can be tricky. You want to protect your painting without bulking up its weight.
As an oil painter, your top goal is to ensure your canvas does not get punctured. If your painting is worth a lot, you might want to take the work to a specialist packaging company that custom makes and builds crates for high-value artwork.

For the purpose of this post, here is a handy and quick guide on how to package an oil painting for shipping. Keep in mind this is a general, illustrative guide to packaging. The advice can be used for larger works scaling up to accommodate large oil paintings.
Materials Required:
- Scissors or Stanley Knife( utility knife)
- Packaging Tape
- Heavy Duty Black Refuse/Garbage Bags
- Foam Board
- Foam sheet
- Triple-ply cardboard

Wrap the Canvas in a Light Layer of Foam
Wrapping your canvas in a light layer of foam, will protect the painting from getting scratched or nicked during transit. Do not use too much foam as the corner protectors will not sit nicely on the edge of the frame. Tape the frame neatly in place as if you were wrapping a delicate gift.
Protect the Corners
Extra protection is always a good idea. Most packaging companies offer a range of corner protectors in plastic, foam or cardboard. With unframed oil canvases, it is best if you invest in foam edge and corner protectors. The foam protectors should fit snugly, but not too tightly. If your work is framed, you can use plastic or cardboard protectors. However, these will need to be placed on the frame first before wrapping it in a light layer of foam.

Seal from Moisture & Dust
Now that you’ve carefully wrapped your canvas in a light layer of foam and used the corner protectors, it’s time to seal the artwork from moisture and dust with plastic or a heavy duty black refuse/garbage bag. If the bag is significantly bigger than the frame, use a pair of scissors to trim the excess material.
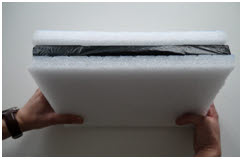
Insulate the Canvas
To insulate the canvas you will need insulating foam. It may be difficult to locate insulating foam large enough to accommodate the size of your artwork. If so you may need to use multiple boards, carefully tapping them together to form a sandwich. If your artwork is on the smaller side, you will need to cut out two slabs of insulating foam. Trace the form of the artwork with your Stanley knife to cut out two artwork sized slabs of foam. Use each slab to sandwich the frame.

Now, tape the slabs in place as show in the photo. If you cannot access foam slabs, two to three layers of bubble wrap will be a sufficient replacement.
Customs Documents & Shipping Labels
When booking your courier service, most companies provide customs and shipping labels at time of booking. Of course, customs documents will not be necessary if you are sending from one US state to another state. However, if you are shipping abroad, you will need to double check any shipping restrictions for the recipient country. Most companies will auto generate custom forms and labels at time of booking. All you need to do is print these documents out and attach them to your package. It’s recommended if you are shipping abroad to include a duplicate copy inside the box.

Box the Artwork
Most packaging companies will wrap artwork with triple-ply cardboard for a custom fit. This also saves using parcel chips and bulking up the package. It’s fairly obvious the bulkier a package is the more you will have to pay to send it. You can achieve a custom fit with cardboard from a flattened box or a purchased sheet of cardboard.
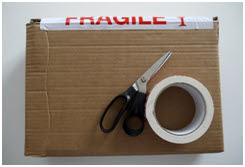
Wrapping the artwork is similar to wrapping a boxed gift, just with thicker materials. Score each side of the package, cutting in the corners, so the flaps can be gently folded and taped into place. Fold the flaps around the frame, and tape to secure.

Seal the Artwork
Now, that you’ve wrapped the artwork and taped the cardboard in place; it’s time to seal it. Don’t worry if your package isn’t picture perfect. This isn’t an aesthetic exercise. It’s just needs to be secure, so you’ll need to seal the edges at least twice all the way round as show in the photo above.
Attach Labels and Documents
If there is any wording or bar-codes on the box, these will need to be removed, concealed or blacked out with a marker. This will avoid delays when the courier comes to collect. Attach all labels and custom documents carefully to the parcel.
While you may be tempted to roll your painting to save money, it’s not the best way to send oil paintings. You’ve spent hours perfecting your canvas, so why not use the very best packaging materials to safeguard your masterpiece? Your clients will thank you in the end.
This article was written by guest writer Heshaam Hague with Fastlane International, a comprehensive parcel delivery service company that specializes in sending small, large or heavy parcels by economy or express delivery to and from any country in the world.