In today’s post I wanted to share with you an oil painting demo |The Old Window surrounded by Wisteria and geraniums growing in a planter box. This is in my impressionist style, but it’s still similar in approach to how I start a more detailed work.

The first step is to establish my drawing using a small flat bristle rush and thinned paint using turpenoid and a mix of raw sienna + ultramarine blue. You can click on the images to enlarge.

Next using a thin mixture of ultramarine blue + Alizarin Crimson I make a dark purple to block in the interior of the window panes. The upper section is in shadow thus darker.

Next I start painting in the wall with a thin mix of various orange hued tones modified with purple (Alizarin and Ultramarine) Also I indicate the wisteria vine. The light direction is coming from the upper right indicated by the cast shadow of the window planter box.

I now begin applying some thicker applications of paint to the wall and establish some color for the planter box. I don’t paint all of it, because some of it will be covered with greenery.

I continue adding more color and texture to the wall and the frame around the window. I want my painting to have the appearance of an aged wall.

Here I’ve turned my attention to the window panes still using various mixes of the ultramarine and alizarin. I also added a little transparent oxide red into the darker area to warm the temperature. A little white is added to the violet mix, with a little more ultramarine to shift it to a blue violet for the lower half.

Now I block in some green foliage in the planter box. More yellow green for the light area, cooler greens for the shadow.

I now add my geraniums. Cadmium red light with a pinch of white + cadmium orange for the light side and cadmium red light + alizarin crimson for the shadow with a speck of blue, but not too much. I also finish out the foliage in the planter box and work on the shadows under neath the box. Next using a small soft flat brush I make short vertical strokes indicating the wisteria blooms using Dioxine Purple + a little white but not too much. Highlights will be added, so this color represents the dark shadowed portion of the blooms.

I continue working on the wisteria vine by adding some texture to the blooms. I used a small soft flat brush with a good edge on it and made some horizontal marks using the same base color for the blooms of Dioxine Purple and white. You’ll notice a few highlights on the blooms in the middle area of the window.

I continue adding highlights on the blooms with a lighter mix of Dioxine Purple and white. I also add some of the vine to connect the blooms. They don’t float in space! In most instances in working with flowers like this it’s best to put the flowers in first and greenery later as you will see in the final step.

Finally I add the greenery of the wisteria vine and some thick opaque yellow green highlights near the mid section of flowers in front of the window. A few thicker applications of paint for the geranium blooms in the sunlight and a few modifications here and there. This painting was completed in one painting session without having to let it dry between stages. This was due to having started with thinner mixtures of paint with turpenoid and a little medium and then thicker applications on top with some Liquin Impasto medium added to the paint. This accelerates the drying of the thicker paint applications.
I hope you enjoyed the oil painting demo | The Old Window!
For further instruction you may enjoy my eBook titled: Creating a Sense of Place in Landscape Painting.
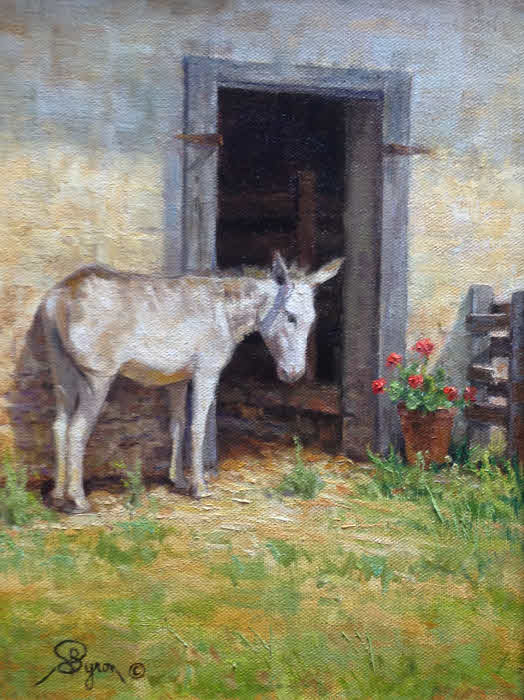
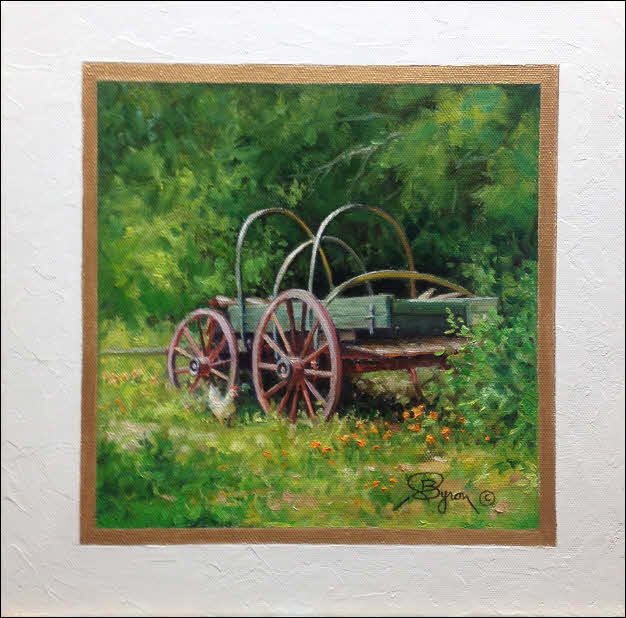
The Old Window painting and two below were featured in one of my eBay auctions. If you would like to receive notices about future auctions, be sure to sign up to receive my periodic update newsletter.

“Little Fellow” 12×9 Oil by Byron copyright 2015 click here for a larger view

The Old Wagon 12×12 canvas size 8.5×8.5 image size by Byron copyright 2015.Click here for a larger view.
HI William,
Thank you so much for your amazing tutorial. All your paintings are so beautifully painted.
Each painting is a reflection of your great love and joy for painting.
It is truly overwhelming and inspirational…looking at all your wonderfully and sensitively
created art works.
I am blessed by the privilege of your sharing.
Yes…it is a great joy to paint and I believe that the splendour and beauty of your paintings has given me determination and inspiration to continue painting!
Yvonne Lee
Singapore
July 12, at 11:55 am
Thank you for you kind words Yvonne. I’m happy you found my work to help give you determination and inspiration to continue painting. I wish you the best.
Thanks for sharing. I really like the colors of the Old window painting 🙂
Thank you! I’m glad you liked the colors in the painting.
As someone just beginning my venture into oil painting, I found your instructions well ordered, informative and not so overwhelming that I’m discouraged. I think the addition of the step by step development of the window painting was most helpful! Thanks.
You’re welcome Paul. Glad the tutorial didn’t overwhelm or discourage you. I tried to keep it simple. It’s a lot to juggle when first starting out in painting.
Very informative. Thank you
Very well done…waiting on a video tutorial.
Thank you Sandy. I now have a short video tutorial. Getting some practice in making these. Will include more as time goes on.
http://hagermanart.com/blog/oil-painting-video-demo-old-barns/
I love you style of painting !! I am a self taught artist . I am hoping to have more time to improve my technique , as I will be retiring next year !
Thank you Debbie. Hope you can paint more in the near future.
Very helpful. Thank you very much.
You are very welcome!
Great demo…I wish you had videos!
Of great help! Thanks. Just wanted a few bits here and there to help my child in painting
I’m glad you were able to get some info that helps your child with painting. That’s one reason I do this blog to provide some guidance on painting. Thanks for commenting!
Truly instructive lesson; I gained a lot indeed.
I’m glad you gained a lot from the lesson Adolfo. Thanks for telling me about it.
Good Day Sir…
I like to learn oil painting…please advise some easy way for that…
Thanks & best regards,
Jinesh
Glad you have the desire to learn oil painting Jinesh. I wish I could say there is a easy way to do that. In time I plane to have an online workshop/study course that will cover much of the basics. But, it’s in the early stages still. If possible where ever you live, look to see if someone teaches oil painting. Being in a class can help get you started. Plus you can look online for art instruction videos, books etc. You have to be discerning though. Look for an artist whose style you admire.
Helpful, indeed! Helped me figure out how things are being done to achieve such effect.
Thank you Maddie, glad the tutorial helped you figure out how to achieve certain effects.
I like your style, do you have any art instructional videos ?
Sorry Andrew, no I don’t have any instructional videos. However, I am working on a project for an online workshop/self paced study course that will include video segments. It’s a big project so I do not have a set deadline. The goal is to give enough information to make it worthwhile, but not so much so that you experience information overload.
I do have a short video in this blog post. http://hagermanart.com/blog/oil-painting-video-demo-old-barns/
Succinct yet comprehensive – covering everything. ALl you need to know so now . . . . Just get and do it! Warmest wishes for your continued success
Thank you Michael. Yes I did want to keep it succinct and simple. The subject lent itself to accomplishing that.
very informative and Goodto learn more about the oilpaint technique !!thanks
Glad this post was helpful.
Looking for ideas. I have a demo coming up.
Hope your demo goes well.
Makes oil painting look doable
Very enjoyable Thank you
Glad you found it enjoyable and it is doable.
Very nice I love ur colors.easy to follow
I’m happy you found the demo easy to follow.
I’ve just gotten into painting (at 52!) and absolutely love both of your styles. Saw where you were at the Winnsboro Art and Wine Festival last year and am so disappointed I didn’t know about it. Will you be anywhere else in the coming months where we can see and purchase your work? Another festival or gallery in the East Texas area?
Hi Teri, sorry I don’t have any shows planned. I only agreed to do the Winnsboro show because my wife’s brother lives nearby and his wife was helping out with the event. So it was incorporated into a family visit. But, I normally don’t do the art fair circuit, but made an exception this time around. I won’t do it again. I’d rather drive around the country side with my camera. I show at Griffith Fine Art in Salado, TX but that’s not exactly east Texas. Plus, there has been a lot of construction on Interstate 35 in that region. Not sure how it is now, but it had slowed traffic into the town and I have not sent any new work there.
Thanks for your response and if we go on a road trip, the gallery in Salado will be on the list. Don’t blame you a bit about not doing a fair again, lol! Your work doesn’t seem like the fair type! Fine Art Gallery, yes; fair, no! Love your blog posts, learning so much! Thanks!!
i very much admire your great artistic talent
please tell me how to purchase your dvd
Thank you for your comment, however I do not have any instructional DVDs. Sorry.
Hi William, I just wanted to let you know when I went to my art class, I’m working on my second painting, I used your information and it made such a big difference I couldn’t believe it! What I would like to ask you is do you have any tips on painting animals? I’m painting a bald eagle and I would like to make it look as real as possible. I think I can do the eye and make it look real but the feathers are a little different. Any advice you could give me would be greatly appreciated. Thank you for taking the time to read this, Lesley Falcone
Hi Lesley. I’m glad my information made a difference with your painting. As for painting animals that’s not my area of expertise, however, I have helped students with such projects from time to time. The underlying key to making any object look real is not so much in the details as it is in getting the light and shadow patterns correct which describe the animal or whatever object you’re painting. For example. How is it that you can recognize someone you know from a distance? You can’t see their eyelashes, hair or the details of their eyes. You see their topography. The ins and outs of their structure. In a landscape, how do you recognize an oak tree off in the distance from a pine tree? You can’t see the individual leaves can you? It’s the shape and the way the light and dark patterns work together to describe the form. You can recognize an object often by it’s silhouette, but it doesn’t fully describe the form. So, when it comes to painting your eagle think of it in artistic terms. Your eagle is comprised of shapes or forms. Light falls on them producing shadows. Paint that first. Squint at your subject to remove the details and paint it that way. Or if your image is digital and if you have a photo program where you can manipulate the image and blur it, so all you see is the light and dark patterns do that. Paint it that way. Then let it dry. Then you can draw on top of it to render (paint) the feathers in more detail. Be observant of edges. Feathers are soft. Hope this helps a little.
Nice short intro to the basics of oil painting. I appreciate the brevity. Your painting is peaceful and romantic. Clearly you an accomplished artist. Next off to ETSY to look at your other work.
Thank you John.
Thank you for all the wonderful information. I am a beginner at this and with your information it’s made it a lot easier for me to understand how to mix the correct color that I need. Also your painting lesson are great Thank you again !
Thank you very much for sharing your art and methods. It is beautiful. I am going to try it.
Gm ….v interesting and hard work can be seen ….
You are God gifted….well organised and highly communicative….
Great and blessed I am to see your art ….
Can learn so much from you
Thank you …
Mrs kishor
I’m glad you’ve found my lesson of benefit.
Beautiful! Most helpful!!
Thank you for this wonderful inspiring tutorial, greatly appreciated. William, would you have this painting or brush technique on a video where one can watch how you paint? Does this brush technique have a “name”?
Please don’t laugh, but I learn better from watching before I attempt anything! Now you can laugh……! I actually learned to play the piano in the same way, believe it or not! Would you have this tutorial on video where I could watch you paint even one section of any of the images of the wisteria painting? The reason I ask is because I have searched on YouTube and cannot find anything similar and I am currently trying to paint a street scene with old buildings and it needs that old worn look apart from adding and mixing colors, their seems to be a brush technique to this. William, please advise on this, I would be most grateful to you, and seriously love your work. Thank you so much William, great tutorial, will be looking out for more!!
Thank you Lynda, but sorry I don’t have any videos. Hopefully one day I will venture into doing that for some of my blog posts.
Awesome work! Thank you for the demo.
You’re welcome Kip. Thanks.
Thank you William,
Excellent presentation – clear and succinct advice. Looking forward to more instruction from you.
Bob
Here goes, I will try ‘The Old Window’!
Glad you will give it a try Elizabeth. Nothing ventured nothing gained, but you can do it!
excelent
Thanks, William, for this inspiring tutorial. You made it look easy enough for me to dare venture to try it out. I hope to paint a nice picture for my wife’s birthday next April. Given the long drying time for oils (I intend to do it with water-mixable oils), I should be starting anytime now. And coming across your tutorial gives me impetus !!
Malcolm, I wish you success on your painting. Glad the tutorial inspired you to give it a try!
Thanks. I wanted to paint from a long time.
Just after years, while I was thinking to start, I got inspiration from your instructions page and this demo.
Thank you for inspiration.
I’m glad this tutorial helped inspire you to start painting!
thank you for sharing your painting
You’re welcome!
Thank you William for such a great and simple tutorial. Really helped me to get started oil painting as it was the hardest part for me. I am a newbie and I really had a hard time and almost destroyed the old window picture by painting wet on wet. Do you have recommendations or tutorials for painting wet on wet?
I’m happy my tutorial helped you get started with oil painting. Painting wet on wet can be a little tricky at times. Here are some things to keep in mind when doing so. The first layers should be kept thin, perhaps adding a little thinner such as odorless mineral spirits (Turpenoid). Thin can also mean just a thin application of paint using just the pressure of your brush. In this case a bristle brush to spread the paint. Thicker layers of paint can be applied on top. You can also add mediums to your paint but don’t over do it. Don’t turn your paint into soup. I typically use Liquin by Winsor Newton and also Liquin Impasto. One thins the paint the other is for thicker applications. Both speed up the drying. However, remember that each time you make a stroke on top of wet paint you’re picking up some of the underlying color. So if you want to keep your mixture clean, wipe your brush and pick up fresh paint each time laying the color on top. Make that brush stroke count. In other words don’t try and over modify it otherwise you’ll be pushing the paint you just put on into the underlying color. However, if that’s what you want it to do then fine. It would be like mixing your color on your canvas instead of on your palette. When I was adding the wisteria blooms on top of the wet background I had to wipe my brush and pick up clean color each time, otherwise I would have sullied the violet mixture and I didn’t want that. Hope these tips help you with working wet on wet. Thanks for the question and your comment.
Love your tutorial; was I knew what larger brushes you use and how thin to make your paint for the walls. I paint very precisely and w much detail, so painting as you do is quiet a step for me. Love your softness, especially your walls.
What a joyful group we are with our painting!
Bye for now,
rw
Glad you found the tutorial of benefit. As to larger brushes I decide according to the size of the canvas. Since the original was 12×9 I probably didn’t use a brush larger than a size 8 bristle flat. The initial paint for the wall was a transparent thin wash using turpenoid. After the wetness disappeared, I could use thicker paint on top without it sliding around all over the place. I didn’t pile the paint on, but enough to cover, knowing I was going to add the wisteria on top. Areas where I knew that I would not be over painting I could give a little more texture or thickness of paint. The subject matter allowed me to paint it in such a way as to finish it in one session. Other paintings I do under my William Hagerman signature are far more detailed and require numerous paint sessions.
thank you for that tutorial. i just recently took up oil painting, after learning soft pastels last year. i have a verrrrry long way to go! but, this helped a lot! i will practice what i just learned from you later & let you know how it went. thanks again!
Happy the tutorial helped out Nina. Keep practicing. I wish you success.
I would love to learn! Can you learn, or are people just naturally talented to paint?
People can learn to paint DeAnna. Talent as it relates to painting is simply an aptitude that a person has for translating visual information onto a flat surface. Talent helps, but isn’t completely necessary. Skills can be learned. Determination is a more valuable asset along with practice.
This tutorial was amazing,…ive been painting for 15 years and now just starting to get my colors looking better
Glad the tutorial helped. Color can be a challenge. Keep painting and learning!
Ive been painting realistic oils for 15 years and i am just now begining to get more vibrant colors…..this tutorial helped me.,…thanks
I enjoyed and appreciate your very clearly thought out and expressed painting knowledge. Thanks
Thank you Jim. Happy you enjoyed reading thru the tutorial.
I really enjoyed reading this article . I want to learn how to draw and paint but do not know from where should I start
I hope the demo provided you with a bit of a starting point. You can also read my overview of some oil painting basics. Hopefully this will give you some additional guidance.
I very much enjoyed the Old Window demo. Looking forward to updates.
Glad you liked the demo Claude.
Enjoyed the demo, as I was strolling thru the web. I am just getting back into painting and would like to receive any post. Thanks
Glad you enjoyed the demo John.
Some very useful tips here, I painted something similar & now I see where I can improve. Thank you
Glad you found the tips useful in improving your own painting. Wishing you the best on it.
Very helpful with the step by step instruction.
Thanks Chris.
Just had contact with you via email; thanks for getting to know each other… Good luck and thank you for sharing these magnificent landscapes!
Thank you Marc for the email and your nice comments about my art work. Best regards and keep painting.
What a privilege to have found you on the internet and shared your art. As a struggling artist myself you have inspired me. I look forward to seeing your new works and demos. Thank you
Glad my art has inspired you Pam. Thank you.
Dear William
Thank you so much for your clear, precise step by step instructions given in your “Old Window” demo. I have learnt so much in just reading once through your site. Also thank you for the ‘hover’ glossary for the art terms used. All the best to you.
Maureen
I’m glad my art info on some of the fundamentals of painting from my main website along with this demo has been helpful and that you’ve learned from it. Thank you for letting me know.
beautiful thank you
Thank you Kay. I’m glad my art brings a measure of beauty into the lives of others.
Thankyou for your very generous and lovely art information- so brilliant to read and so useful for me: I’m an overwhelmed beginner!
Lizzie, I’m glad to see that my demo was useful for you. Painting can be a little overwhelming for a beginner, but don’t let that deter you. Keep practicing. Pick subjects that are relatively simple. A complex scene can be too daunting when just starting out. Perhaps just pick a singular subject to work on such as painting a sky. Maybe it will help mitigate those overwhelmed feelings and increase your confidence.
I loved the way you presented the step by step instructions…i have taken up art as a pastime and want to learn more about oil painting. Your site impressed me a lot, it’s especially good for beginners like me.
Thanks
Hi Jacob. Thanks for commenting on my blog and that you found the information useful. Painting is a great pastime. Even though painting is a job for me, I never find it to be a chore…well maybe once in a while when things don’t go as planned. 🙂
Thanks for the free advice….not everyone can afford fine art schools 🙂 Very helpful color mixing tips thanks again for sharing
Glad I could share something useful. Yes, fine art schools are pricey. I never did go to one and I still learned to paint.
Hi William
thanks for the reply. I really like your work and look forward to more tips and advice. I recently started painting and I have a much better understanding of cool and warm colors and use of colors for highlights and shadows just from following your demo here and all the info you share on the blog. It is really nice of you to take the time and share this valuable information.
Must paint more now 🙂
Don
Great demo!! I have been looking at your painting over and over again, very much admire your realistic paints and wonder if I can learn it from you. Do you offer online class?
Thank you
Jasmine
Jasmine, glad you liked the demo. I don’t have an online class, but I hope to eventually have an art course/workshop online that would be a self paced course. I’ll continue to share periodically other painting tips that hope will help with your painting efforts. Here is another post you might like to look at: How to Paint a Tree
Love the instructions. Thanks
Glad you like the instructions Eric. I try to make them informative.
Hi William,
I really loved the old window and the demo. Is it ok to try to copy this for myself? It will also give me some extra practice works.
Absolutely love your realistic style of fine art and find myself checking for new works often!!
Thanks,
Kat
Hi Kathy,
Thank you. I’m glad you like the demo. I don’t mind if you use the demo for practice. You could even change the type of flowers in the window box, or substitute a different flowering vine such as a trumpet vine. The process would be the same. So if you like some other flower that grows well where you live, you could make the painting more personal and use the demo as your step guide. Just some ideas.
Loved the ‘Old Window’ painting and demo. It inspires me to try and pick up a brush again after many years away. I enjoy all your landscape paintings..so beautifully done. Thanks for sharing.
Thank you Sherry for commenting. I endeavor to make my work inspiring, not only to those who purchase my art, but also for those such as yourself who at one time painted. I hope you pick up your brush and start painting again.