Category Archives: Art Tips

Food and Art; It’s all in the presentation.

Recently my wife and I got away for the day to celebrate our 9th anniversary and do a little antique malling. Afterwards we were hungry but also wanted to check out any nearby places for wine tasting.  We came upon a place in Lubbock, TX called La Diosa Cellars. The food and wine was great, and then there was dessert. It got me to thinking about Food and Art; It’s all in the presentation!

Here’s a photo. That’s chocolate, blueberries and cream.

food and art

So what does this have to do with art? It’s all in the presentation. When we first walked into the establishment, we were greeted with a pleasing, artsy, laid back atmosphere. Very comfortable surroundings. The menu description of the food was mouth watering and then the presentation was great. So it goes with ones art work. If you want to put your work out there and sell it, make it palatable. If you’re showing your work in an art booth, make your surroundings inviting. If you work in 2D media, frame your work well.  The presentation can’t be overlooked. If your work is good to begin with, taking the time to make it even more mouthwatering is worth the extra effort as the photo below illustrates. So remember: Food and Art; It’s all in the presentation!

empty dessert plate


Painting Clouds an Oil Painting Demo

Here in part 3 of my oil painting demo of a Texas landscape I move on to painting clouds and the sky.

To begin the sky I start at the horizon. I do this to judge my values against the distant hill and values on the shadowed side of the tree up against the sky area. Click image to see a larger view.

painting clouds oil painting demo

Just as in the landscape portion of the painting the goal is to achieve a sense of distance. It is not some blue flat backdrop for the rest of the painting. There is aerial perspective in the sky and a diminishing size on the clouds as they move into the distance. The amount of dust particles or other adulterants floating in the air has an effect on the colors as the recede just as in the landscape portion. Typically white clouds are somewhat “whiter” for lack of a better word closer to you with often a discernible shift in the color of the white portion of the clouds towards orange to a pinkish hue near the horizon.

In the photo below of some white clouds you can see what I’m talking about somewhat at least. Notice how the whites have shifted to a pinkish gray towards the horizon.

color recession in clouds

color recession in clouds

Also the contrast becomes more subtle between the light and shadow areas of the clouds as they recede and colors become grayer. I’m not talking white and black gray here. Just duller in intensity.  I chose a variety of violet grays for this painting. Also be sure to overlap some clouds. This will make your painting more authentic and create a greater sense of depth.

After I establish a few of the clouds I then paint in the rest of the blue portion of the sky.

sky2_sml

Think of the sky of having 3 bands. A top section, middle and bottom and each section is further away. The top has more blue with a touch of red, so I use some ultramarine blue to the middle color which has more phthalo blue in it. The reason is that there is often a yellow element shifting the sky towards green as it recedes. I even use a little phthalo green. But once it gets to the horizon it shifts to a gray.

sky5_sml

Here’s the sky in context to the rest of the painting at this stage.

sky4_sml

In the next session I will move onto the rest of the landscape.


Oil Painting Demo | Texas Landscape

In my previous post you learned about my large 48×72 commission painting that is to go into a Military hospital at Ford Hood. Being based in Texas the requested commission was to be a Texas landscape with bluebonnets. In the next several posts I will be sharing the progression of this project as an Oil Painting Demo a Texas landscape.

The first step: ( remember to click on the image for an enlargement)

oil painting demo Texas landscape step one

To begin I started with the large Oak tree. Working with a large flat bristle brush I blocked in the light and shadowed areas of the tree foliage to establish the tree’s form. I then added some limb structure.  You may wish to look at this post on How to Paint a Tree which is a very basic approach. Now that I have a basis to compare and judge other color and values I move on to the section behind the large tree. I also established some of the rock outcropping underneath and in front of the tree.

After this painting session I moved to the next adjacent area of importance. The distant hills.

oil painting demo a Texas landscapae with bluebonnets step two

I started with the distant hill with white, ultramarine blue and a speck of cadmium orange to gray it. As the next hill progressed forward I darkened the blue mix with more ultramarine blue. It also made it more intense and less blue gray.  The next layer of hills start showing some structure of trees. It’s a simple area of light and dark, with the values relatively close in range. Shadows are kept in the blue range with the addition of a little violet. The light areas are variations of warm colored grays, however they are cooler in temperature than the colors closer to us.  One of the grays was made by adding cadmium orange to ultramarine blue and then white. This value represented the light on the trees. Some areas had a spec of green added to the mix, but you have to keep away from any strong yellows or you’ll destroy the atmospheric perspective. Ask yourself, why do blue hills made of green trees look blue? The yellow element is missing.

I’ll continue to refine this area and when complete I’ll be sure to include a close up.


Landscape Oil Painting Commission

Recently I was contacted by Distinctive Art Source which is one of only two premiere healthcare art consultancies working exclusively in healthcare in the United States requesting a bluebonnet landscape oil painting commission for the National Intrepid Center of Excellence at Fort Hood. The painting is to be displayed in the reception area. When I asked about the size it was to be a 48″x72″ painting and will be under my Byron signature. This allowed me to keep the price within budget.

Aside from working on a couple of murals in the past, this will be my largest studio painting ever! I’m really looking forward to working on this painting.

My first challenge was the canvas itself. The finished work will be shipped rolled. Thus I would need to stretch the canvas in order to paint it, then undo it in order to ship it. Sounded like a lot of extra work. Could it be made simpler? YES!

I found a great product called Genie Canvas. It’s a collapsible canvas. It all comes in a sturdy tube which is reusable and is a rather unique system. No special tools were required to assemble the canvas. Including the time to open the package, laying out the canvas and assembling it took me about 10 minutes.

Here’s a video showing how the canvas is put together.

And here’s my canvas on the easel. You can see part of my sketch on the canvas. It was done so with cobalt blue thinned with Turpenoid (odorless thinner) and a brush. You can click the image for a larger view.

48x72 commissioned oil painting by Byron copyright 2015

48×72 commissioned oil painting by Byron copyright 2015

The painting you partially see leaning on the bottom edge of the canvas is my latest commission for Sherwood Galllery in Houston, TX. Here it is below.


bluebonnet landscape oil painting by William Hagerman

Spring Unfolding 18×24 oil by William Hagerman copyright 2015

I hope you’ll follow along in the next few weeks as I complete this large commissioned painting detailing it’s development.

Finding Artistic Inspiration

Whether one is an artist or not, sometimes we just feel uninspired and our creative side feels drained. There’s an abundance of ideas out there in combating this issue of finding artistic inspiration, but lacking any specific health issue’s that may contribute I wanted to focus on one solution to get your creative energy flowing again. What is that?

unplugged

In today’s world people are plugged in to their electronic media at work and leisure time and elsewhere and sometimes dangerously so. Although electronics like being plugged in, because they draw power which they need, humans don’t recharge that way. For the creative side it drains us of our creative energy. In my artist’s statement I have said when we experience the outdoors, we feel drawn to it, nurtured by it. Being outdoors to enjoy the beauty of nature does have a recharging effect. Studies are showing that disconnecting from our devices and getting outside in nature have shown improvements in creative tasks as opposed to those who were not.

There is so much intricate design in nature that it can’t help but stir creativity when you slow down enough to take a little of it in.

Recently we have been doing some yard work. Even in this confined area of a backyard I started to notice the possibility for a couple of small paintings. A subject that I had not really considered and that of painting flowers in an almost still life setting.  Here below are two small paintings showing how just being outside in my own backyard inspired these two paintings. Not that our backyard looks like this, but what flowers we did have was enough to inspire a little creativity and a departure from my regular subject matter.

Corner Garden

Corner Garden 6×6 oil painting by Byron copyright 2015

The Back Gate

The Back Gate 6×6 oil painting by Byron copyright 2015

So the next time you feel a little run down, try unplugging and get outdoors and start feeling the creative energy returning. Even if it’s in your own backyard! If you don’t have a backyard, try a local park. Look at the trees, the sky, flowers, whatever and let it rejuvenate you.

These two “backyard” nature inspired paintings were recently sold on my eBay auctions as were the nature inspired ones below!

Barn and Hay Bales

Barn and Hay Bales 6×6 oil by Byron copyright 2015

I enjoyed painting this little scene of a little barn with a row of honeysuckle growing in front and some round hay bales. Not sure what the name of the purple flowers were.

blooming_yucca_sml

Dos Yucca 6×6 oil by Byron copyright 2015

I liked the contrast of the yucca up against the dark of the tree behind them.

River Elegance Plein Air

Guadalupe River (River Elegance) plein air 8×10 acrylic and oil painting by William Hagerman revised copyright 2015

This was painted directly from life on location in the Texas Hill Country near Boerne, TX along the Guadalupe River. It had remained in my collection for some time, but is now in its new home.

You can access the auctions from my profile page. Any offerings will be displayed here.

Remember, bidding starts at a penny! Have a great day.


How to Package an Oil Painting

brushes

If you sell your painting to an out-of-state buyer, chances are you’ll need to send the artwork by courier. Of course, this raises practical concerns. What is the best way to package an oil painting? Oil paintings are more susceptible to damage, especially if there are thick areas of the canvas covered with multiple layers of paint.

For this reason, we do not recommend rolling up your oil painting to send in a tube. This is OK for a poster or photographic print but taking an oil painting off its stretcher and rolling it increases the risk of damage. Oil paintings take a long time to dry and are more susceptible to damage from light, heat, humidity, dust and dirt. It’s just not worth risking damage to shave shipping costs, it’s a false economy. If you are on a budget it is best to send the item Economy or use a competitively priced courier service. Choose a professional courier, checking feedback scores and customer reviews as well as prices.

Points to Consider
Will you be sending a framed or unframed canvas? Finding the right balance can be tricky. You want to protect your painting without bulking up its weight.

As an oil painter, your top goal is to ensure your canvas does not get punctured. If your painting is worth a lot, you might want to take the work to a specialist packaging company that custom makes and builds crates for high-value artwork.

1

For the purpose of this post, here is a handy and quick guide on how to package an oil painting for shipping. Keep in mind this is a general, illustrative guide to packaging. The advice can be used for larger works scaling up to accommodate large oil paintings.

Materials Required:

  • Scissors or Stanley Knife( utility knife)
  • Packaging Tape
  • Heavy Duty Black Refuse/Garbage Bags
  • Foam Board
  • Foam sheet
  • Triple-ply cardboard

2

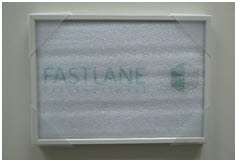
Wrap the Canvas in a Light Layer of Foam
Wrapping your canvas in a light layer of foam, will protect the painting from getting scratched or nicked during transit. Do not use too much foam as the corner protectors will not sit nicely on the edge of the frame. Tape the frame neatly in place as if you were wrapping a delicate gift.
3

Protect the Corners
Extra protection is always a good idea. Most packaging companies offer a range of corner protectors in plastic, foam or cardboard. With unframed oil canvases, it is best if you invest in foam edge and corner protectors. The foam protectors should fit snugly, but not too tightly. If your work is framed, you can use plastic or cardboard protectors. However, these will need to be placed on the frame first before wrapping it in a light layer of foam.

4

Seal from Moisture & Dust
Now that you’ve carefully wrapped your canvas in a light layer of foam and used the corner protectors, it’s time to seal the artwork from moisture and dust with plastic or a heavy duty black refuse/garbage bag. If the bag is significantly bigger than the frame, use a pair of scissors to trim the excess material.
5

Insulate the Canvas
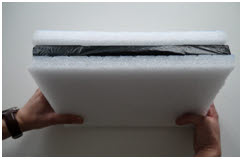
To insulate the canvas you will need insulating foam. It may be difficult to locate insulating foam large enough to accommodate the size of your artwork. If so you may need to use multiple boards, carefully tapping them together to form a sandwich. If your artwork is on the smaller side, you will need to cut out two slabs of insulating foam. Trace the form of the artwork with your Stanley knife to cut out two artwork sized slabs of foam. Use each slab to sandwich the frame.

6

Now, tape the slabs in place as show in the photo. If you cannot access foam slabs, two to three layers of bubble wrap will be a sufficient replacement.


Customs Documents & Shipping Labels
When booking your courier service, most companies provide customs and shipping labels at time of booking. Of course, customs documents will not be necessary if you are sending from one US state to another state. However, if you are shipping abroad, you will need to double check any shipping restrictions for the recipient country. Most companies will auto generate custom forms and labels at time of booking. All you need to do is print these documents out and attach them to your package. It’s recommended if you are shipping abroad to include a duplicate copy inside the box.

7

Box the Artwork
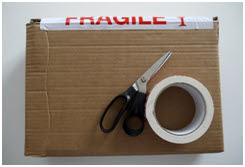
Most packaging companies will wrap artwork with triple-ply cardboard for a custom fit. This also saves using parcel chips and bulking up the package. It’s fairly obvious the bulkier a package is the more you will have to pay to send it. You can achieve a custom fit with cardboard from a flattened box or a purchased sheet of cardboard.
8

Wrapping the artwork is similar to wrapping a boxed gift, just with thicker materials. Score each side of the package, cutting in the corners, so the flaps can be gently folded and taped into place. Fold the flaps around the frame, and tape to secure.

9

Seal the Artwork
Now, that you’ve wrapped the artwork and taped the cardboard in place; it’s time to seal it. Don’t worry if your package isn’t picture perfect. This isn’t an aesthetic exercise. It’s just needs to be secure, so you’ll need to seal the edges at least twice all the way round as show in the photo above.

Attach Labels and Documents
If there is any wording or bar-codes on the box, these will need to be removed, concealed or blacked out with a marker. This will avoid delays when the courier comes to collect. Attach all labels and custom documents carefully to the parcel.

While you may be tempted to roll your painting to save money, it’s not the best way to send oil paintings. You’ve spent hours perfecting your canvas, so why not use the very best packaging materials to safeguard your masterpiece? Your clients will thank you in the end.

This article was written by guest writer Heshaam Hague with Fastlane International, a comprehensive parcel delivery service company that specializes in sending small, large or heavy parcels by economy or express delivery to and from any country in the world.


WHEN A PAINTING DOESN’T WORK

It doesn’t happen very often but sometimes a painting gets laid off… because it isn’t working.

This painting was fired because it wasn't working!

This painting was fired because it wasn’t working!

When that happens an artist has to decide whether to destroy it, donate it, or salvage it in which case you have to figure out when a painting doesn’t work.

Such was the case with a painting that I completed in 2012. It was shown in a couple of different galleries and it just languished on the wall without selling. It did receive some compliments regarding the colors in it, but still there it was on the wall. It wasn’t what I would call a bad painting, but something was certainly lacking.

So, I took it home and decided to give it a good look over after having been away from it. My response after seeing it with a fresh eye was Yuk! No wonder it hasn’t sold. The painting was…well…YAWN, boring!

When I painted it I was using a different studio, and despite being a nice set up it was prone to having distractions. I never felt at home in that surrounding and wasn’t very happy. So maybe my mood was influencing me. Now in my comfort zone and regular studio space I realized that my painting never achieved what the original scene upon which it was based offered.

I realized I needed more contrast, punch up some of the color intensity, redesigning some sections and even eliminating some distracting areas that didn’t support the composition. So I removed the varnish on the painting, and reworked it. Now the painting is back to work in that it captures the mood I experienced when I happened upon this scene. Now, I don’t yawn when I look at the painting.

So what do you think about the changes? Click on the images for a larger view.

Cypress Colors Original

Cypress Colors Original

Cypress Colors Revised

Cypress Colors Revised

As an update to this post, I placed the above painting in one of my eBay auctions with a Buy it Now option. It immediately sold through that option at my asking price. So, rescuing the painting and making some adjustments gave it new life and a new home. If you’re an artist perhaps try such a approach with your own paintings that have been “fired.”

Making a Custom Illusion Frame

Part Two:

Continuing with the making of my custom illusion frame, I next painted a fleur di lis design in the four corners using a stencil. I used a lighter gold paint as well as a thin darker outline around the design for a little more contrast. If you missed part one you can read it here.

Custom Illusion frame step 6

Custom Illusion frame step 6

After the fleur di lis design was dry I covered this inner panel area with Folk Art brand acrylic antiquing medium by Plaid Enterprises using a soft cloth to give it a soft aged look. Once dry I masked off another one half inch space from the edge.

Custom Illusion Frame Step 7

Custom Illusion Frame Step 7

I apply acrylic gesso to the masked off section. Once dry I give it a light sanding, and followed with painting it solid black.

Custom Illusion Frame Step 8

Custom Illusion Frame Step 8

After taking off the masking I see that there has been a slight run of the acrylic paint. No problem, I just use some gesso and a small brush to clean up the edges in a few spots.

Custom Illusion Frame Step 9

Custom Illusion Frame Step 9

Next you can see the results of my efforts so far with my custom illusion frame. Remember to click on the photo for a larger view. The larger view for the photo below will show the frame with a side view.

Custom Illusion Frame Step 9 detail

Custom Illusion Frame Step 9

After this I mask off an additional one fourth of an inch extending from the black border which will give a white border around the finished painting. I also masked off the entire frame to protect it while I paint the landscape I have planed for it. I know it doesn’t look too pretty, but it works.

Custom Illusion Frame Step 10

Custom Illusion Frame Step 10

And finally here is the completed result with my impressionist “Byron” painting. So the frame and painting are all part of the art work. In part three of my next post I will share several photos of the painting as I worked on it.

Bluebonnet oil painting by Byron with a custom illusion frame

Completed Custom Illusion Frame with original painting by Byron


How to Improve your Oil Painting by Creating a Story

Another title for this post could be When the Subject isn’t the Subject in a Painting. What do I mean?

The best way to answer that is with an example. Years ago I saw a painting that is an excellent example of what I’m talking about by artist Oleg Stavrowsky titled: Something’s Funny as seen here.

An example of good story telling by artist Oleg Stavrowsky

When you look at it, your eye will travel to the cowboy on the far left, holding his cowboy hat with his extended arm.  From a compositional point of view, he’s the main subject of the painting. Or is he?

The real subject of the painting is not what’s in the painting, but what is going on outside our view that is making these cowboys laugh and take notice. We become engaged as well, wondering what it is that’s making them laugh. It’s a story line that we can take part in. Not that every painting has to tell a story, but it should not be overlooked how an implied story can emotionally engage your viewer. So don’t underestimate the value of how to improve your oil painting by creating a story in your own art work as well as improving the marketability of it.

Negative Shape Painting

Often when you think of something being negative, it’s not a good thing. However, in painting it is when it refers to negative shape painting. This was the subject of an art demo that I did for the Palette Club in Midland, TX.

Exactly what is a negative shape or space? It’s the space between and around a subject and not the subject itself. In simplistic terms it’s the silhouette of an object.

To illustrate the concept I used a black gessoed canvas and sculpted out the silhouette of a tree by painting the inner and outer unoccupied spaces. I did not paint tree limbs, but gave the impression of limbs by painting the spaces in and around them as the following photos illustrate. Thank you to G. Hutson for taking the photographs at the demo.

I started by painting the outer spaces leaving what appears to be a solid black silhouette of a tree.

William Hagerman negative shape painting demo

Next I move into the interior negative shapes.

William Hagerman negative shape painting demo

I continue with the interior and exterior negative shape painting, chiseling out and refining the shapes until I’m satisfied with the result.

William Hagerman negative shape painting demo

I employ this technique of negative shape painting quite often, especially with trees.
Below is a detail section from my painting titled: “An Open Door.” All the “sky holes” within the tree were painted using this method of negative shape painting.The pluses of this technique is that it strengthens your visual perceptions and enhances your painting for if the negative shapes are interesting, likely your subject will also be just as interesting. Practice this in your own painting and see how much your work will improve! To see the full image of “An Open Door”, check out the following post.

Detail section of an oil painting by William Hagerman copyright 2013